
Quilting is a timeless craft combining creativity and practicality, creating beautiful, functional pieces while preserving memories. Modern tools and AI enhance efficiency, making it accessible and enjoyable for all skill levels.
1.1 What is Quilting?
Quilting is the art of stitching together layers of fabric to create a single, cohesive piece, often used for bedding, home decor, or as a meaningful gift. It combines creativity with technical skill, allowing individuals to express their personal style while crafting functional items. Quilting typically involves three layers: the quilt top, batting, and backing, which are sewn together using a needle and thread or a sewing machine. This craft is not only a practical way to create warm blankets but also a form of artistic expression. Quilting can be done by hand or machine, offering versatility for quilters of all skill levels. It’s a rewarding hobby that provides a sense of accomplishment and the joy of creating something tangible. Many quilters find it therapeutic, as it allows for creativity and relaxation.
1.2 History of Quilting
Quilting has a rich and diverse history that spans thousands of years, with roots tracing back to ancient civilizations in Egypt, China, and Europe. Early quilts were crafted for warmth and protection, often using layers of fabric stitched together. The technique became highly valued during the Middle Ages, where it was used to create bedding and clothing. In the 18th and 19th centuries, quilting flourished in America, becoming a cornerstone of family life. Women would gather for “quilting bees,” sewing together and sharing stories. These gatherings not only produced beautiful quilts but also fostered community bonds. Over time, quilting evolved from a practical craft to an art form, with modern quilters incorporating new materials and techniques. Today, quilting is celebrated globally, blending tradition with innovation, and continues to be a symbol of creativity and heritage.
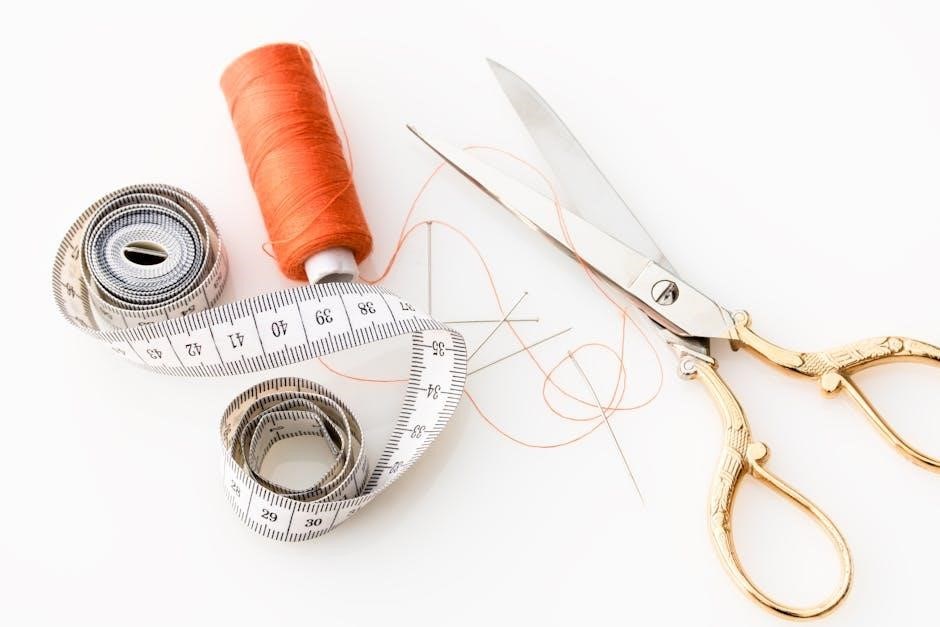
Basic Tools and Materials
Essential tools include rotary cutters, mats, rulers, sewing machines, and scissors. Quality fabrics, batting, and thread are vital for creating durable, comfortable, and professional-looking quilts.
2.1 Essential Tools for Quilting
Quilting requires specific tools to ensure precision and creativity. A rotary cutter and mat are indispensable for cutting fabric accurately. Rulers, both standard and quilting-specific, help measure and align pieces. A reliable sewing machine is a cornerstone, offering various stitches for piecing and decorative elements. Sharp scissors and specialized rotary blades are crucial for clean cuts. High-quality fabric, threads, and batting are fundamental materials. Needles, both hand and machine, vary by task, ensuring proper stitching. Pins and clamps help secure layers during sewing. Modern advancements, like AI-powered tools, assist in designing patterns and optimizing workflows, making quilting more efficient. These tools collectively enable quilters to craft beautiful, durable pieces, blending tradition with innovation for exceptional results.

Types of Quilts
Quilting offers various styles, each with unique charm. Traditional quilts have classic patterns, modern quilts focus on simplicity, baby quilts are cozy, and rag quilts have a frayed, rustic look.
3.1 Traditional Quilts
Traditional quilts are timeless pieces that often feature geometric patterns, symmetry, and classic designs. They typically use techniques passed down through generations, such as hand-stitching or simple machine sewing. These quilts often incorporate fabrics like cotton and wool, with patterns like the Log Cabin, Double Wedding Ring, or Hexagon designs. Traditional quilting emphasizes precision and attention to detail, reflecting the craftsmanship of earlier eras. Many traditional quilts are made for functional use, providing warmth and comfort, while also serving as heirlooms. They often carry sentimental value, as they may be created from repurposed fabrics like family clothing or linens. The process of making a traditional quilt is meditative and rewarding, connecting quilters to their heritage and cultural roots. These quilts remain popular for their enduring beauty and historical significance, making them a beloved choice for both creators and recipients.
3.2 Modern Quilts
Modern quilts blend traditional techniques with contemporary designs, emphasizing creativity and personal expression. They often feature bold colors, clean lines, and minimalist patterns. Unlike traditional quilts, modern quilts embrace asymmetry and negative space, creating a fresh, dynamic aesthetic. The use of modern tools, such as rotary cutters and AI-powered design software, has revolutionized the quilting process, allowing for faster execution and intricate designs. Modern quilters also experiment with a wide variety of fabrics, including solids, gradients, and modern prints, to create unique textures and visual interest. This style is particularly appealing to those who appreciate both functionality and artistic innovation, making it a popular choice for home decor and gifts. The modern quilting community thrives online, with countless tutorials, patterns, and inspiration shared across platforms, fostering creativity and collaboration among quilters worldwide.
3.3 Baby Quilts
Baby quilts are a popular choice for nurseries and gifts, offering both comfort and style. They are typically smaller in size, making them quick to complete and ideal for beginners. Soft, breathable fabrics like cotton are recommended for safety and durability. Designs often feature whimsical patterns, such as animals or stars, creating a charming aesthetic. Many quilters use rag quilting techniques for baby quilts, as they are easy to piece together and result in a cozy texture. Choosing pastel colors or neutral tones ensures the quilt suits any nursery decor. Baby quilts are not only functional but also serve as heartfelt keepsakes for parents and children alike. They allow quilters to express creativity while crafting something truly special for little ones.
3.4 Rag Quilts

Rag quilts are a charming and easy-to-make variation of traditional quilts, emphasizing a rustic, frayed-edge aesthetic. They are perfect for beginners or those seeking a relaxed, forgiving project. Unlike traditional quilts, rag quilts focus less on precise piecing and more on layering and fraying fabric edges for a soft, textured look. Typically made with flannel or cotton, they involve sewing fabric strips or blocks with wrong sides together, then snipping edges to create the signature frayed effect. Rag quilts are ideal for using scrap fabric and offer a cozy, homespun feel. They are also quick to complete, making them a great option for gift-giving or personal use. The simplicity and forgiving nature of rag quilts make them a delightful project for quilters of all skill levels.
- Easy to make with minimal precise cutting.
- Ideal for using leftover fabric scraps.
- Creates a cozy, rustic texture with frayed edges.
- Perfect for beginners or experienced quilters alike.

Quilting Process
Quilting transforms fabric into meaningful, functional art, blending creativity with precision. Modern tools and AI enhance efficiency, while tutorials and budget tips ensure accessibility, fostering a sense of accomplishment.
4.1 Planning and Designing
Planning and designing are the foundation of quilting, ensuring your project turns out as envisioned. Start by sketching your design, considering patterns, colors, and fabric choices. AI tools and online resources now offer inspiration and precision, helping you visualize layouts and experiment with color combinations. Decide on the quilt’s purpose, size, and complexity to guide your fabric selection. Create a detailed plan, including measurements and a fabric requirements list. For beginners, starting with simple templates or pre-designed patterns can build confidence. Once satisfied with your design, proceed to cut fabric accurately, following your plan. This step sets the stage for a smooth quilting process, whether you’re crafting a traditional or modern masterpiece.
4.2 Cutting Fabric
Cutting fabric is a foundational step in quilting that requires precision and care. Using tools like rotary cutters, mats, and rulers ensures accuracy and efficiency. Start by prewashing fabrics to avoid shrinkage. Always cut on a stable surface, and use patterns or dies for consistent shapes. Rotary cutting is ideal for strips and squares, while scissors work well for curved or intricate designs. Maintain sharp blades to prevent fraying and uneven edges. Sort and label fabric pieces as you cut to stay organized. For accuracy, double-check measurements and align fabrics properly. Cutting fabric is where your quilt begins to take shape, so attention to detail is key. Properly cut pieces ensure a smooth assembly process and a professional finish. Keep scraps organized for future projects or repairs.
4.3 Piecing the Quilt Top
Piecing the quilt top involves sewing fabric pieces together to create the quilt’s front layer. This step requires precision and patience, as accurate cutting and sewing ensure a professional finish. Using techniques like rotary cutting and strip piecing, quilters assemble blocks or patterns into a cohesive design. Modern tools, such as sewing machines and AI-powered design software, can simplify and enhance this process. Beginners often start with simple patterns, gradually moving to intricate designs. Proper alignment and matching of seams are critical to avoid puckering or distortion. Pressing seams as you go helps maintain shape and prevents bulk. Piecing is where creativity shines, as quilters bring their planned design to life, piece by piece. With practice, this step becomes a rewarding and meditative part of the quilting journey.
4.4 Adding Batting and Backing
Adding batting and backing is a crucial step in quilt construction. Batting provides insulation and texture, while the backing fabric ensures durability and a polished finish. Choose batting materials like cotton, wool, or polyester, depending on the desired weight and drape. The backing fabric should match the quilt’s theme and be slightly larger than the quilt top to allow for shrinkage during quilting. Lay the quilt top face down on a flat surface, smooth out wrinkles, and place the batting over it. Finally, add the backing fabric, ensuring it is evenly aligned. Use pins or temporary adhesive to secure the layers. This step prepares the quilt for the final stitching process, ensuring a professional and cohesive result. Proper alignment and tightness are essential to avoid bubbles or distortions in the finished quilt.
4.5 Quilting the Layers
Quilting the layers is the final step where the quilt top, batting, and backing are stitched together. This process can be done by hand or machine, depending on preference. Hand-stitching offers a traditional, personalized touch, while machine quilting provides speed and consistency. Common techniques include straight-line stitching, free-motion quilting, or intricate patterns. The choice of thread color and type is crucial, as it enhances the quilt’s design. Proper tension is essential to avoid puckering or loose fabric. Quilting can be minimal or elaborate, depending on the desired aesthetic. Modern tools and AI-powered sewing machines often feature pre-programmed patterns, making the process more efficient. Once complete, the quilt is ready for binding, completing its transformation into a durable, beautiful piece of art.
Common Quilting Techniques
Common quilting techniques include rotary cutting, strip piecing, appliqué, and binding, each offering unique ways to create intricate designs and durable finishes for quilts.
5.1 Rotary Cutting
Rotary cutting is a fundamental technique in quilting that involves using a rotary cutter and mat to accurately cut fabric into precise shapes and strips. This method is highly efficient for achieving straight cuts, especially for large-scale projects. The rotary cutter, typically a circular blade, glides smoothly across the fabric, while the cutting mat protects the work surface and ensures safety. Quilters often use rulers alongside the cutter to measure and cut fabric with precision. Rotary cutting is particularly useful for strip piecing and creating uniform fabric pieces, which are essential for many quilt patterns. It also allows for quick adjustments and minimizes fabric waste, making it a versatile tool for both traditional and modern quilting projects. By mastering rotary cutting, quilters can streamline their workflow and achieve professional-looking results.
5.2 Strip Piecing
Strip piecing is a popular quilting technique that involves sewing together long strips of fabric to create dynamic, cohesive designs. This method is ideal for beginners and experienced quilters alike, as it simplifies the process of constructing quilt tops. By cutting fabric into uniform strips, quilters can quickly assemble blocks or entire quilts with minimal waste. Strip piecing is particularly useful for creating modern, geometric patterns and is often used in projects like strip quilts, jelly rolls, or chevron designs. Modern tools, such as rotary cutters and precision mats, make this technique even more efficient. Additionally, AI-powered quilting software can help design intricate strip patterns, ensuring accuracy and creativity. Strip piecing is a versatile and time-saving method that allows quilters to bring their ideas to life with ease and precision.
5.3 Appliqué
Appliqué is a popular quilting technique where fabric shapes are sewn onto a larger fabric surface, creating decorative designs or patterns. It allows quilters to add intricate motifs, such as flowers, animals, or geometric shapes, to their projects. Appliqué can be done by hand or machine, with each method offering unique results. Hand appliqué provides precise control and a soft, hand-stitched look, while machine appliqué is faster and ideal for intricate or large-scale designs. Modern tools, like fusible web and stabilizers, simplify the process, ensuring shapes stay in place during stitching. Appliqué is versatile, suitable for both traditional and modern quilts, and enhances visual appeal. It’s a great way to personalize quilts with meaningful symbols or themes, making each piece truly unique. Many quilters enjoy appliqué for its creative freedom and the ability to tell stories through fabric artistry.
5.4 Binding Techniques
Binding is the final step in quilting, sealing the edges of the quilt sandwich. It involves attaching a strip of fabric to the quilt’s perimeter, ensuring a polished finish. Common binding methods include straight-edge and bias binding, each offering unique visual appeal. Straight binding uses fabric strips cut parallel to the selvage, while bias binding, cut at a 45-degree angle, provides stretch for curved or intricate edges. Pre-made binding strips are convenient, but quilters often prefer customizing their own for a personalized touch. Modern tools, like rotary cutters and sewing machines, simplify the process, while tutorials and AI-powered guides provide step-by-step instructions for flawless results. Binding not only protects the quilt but also enhances its aesthetic, making it a crucial skill for quilters to master.

Finishing Touches
Finishing touches like adding borders, quilting layers, and hand-stitching bindings enhance the quilt’s appearance and durability, ensuring a polished, professional result that completes your creative vision.
6.1 Adding a Border
Adding a border to your quilt is a fantastic way to frame your design and add visual appeal. Borders can be simple or intricate, depending on your preference and skill level. They serve as a finishing touch, tying together the colors and patterns of the quilt top. To add a border, start by measuring your quilt accurately to ensure the border strips fit seamlessly. Cut the border fabric into strips of uniform width, using tools like rotary cutters for precision. Attach the strips to the sides of the quilt, aligning edges carefully, then press the seams for a flat finish. For a professional look, match the border fabric to your quilt’s overall aesthetic or use contrasting colors for a bold statement. This step enhances both functionality and beauty, completing your quilt’s design. Always consider the quilt’s style when choosing border patterns to maintain a cohesive look.

6.2 Quilting the Layers Together
Quilting the layers together is a crucial step that brings your quilt to life. This process involves stitching the quilt top, batting, and backing fabric together, creating a cohesive design. Techniques like free-motion quilting, straight-line quilting, or using a walking foot can be employed, depending on the desired pattern. Proper tension and alignment are essential to ensure even stitching and prevent bunching. Many quilters use modern tools, such as sewing machines with specialized quilting attachments, to streamline the process. Additionally, AI-powered quilting software can help design intricate patterns or guide manual stitching for precision. Always pre-baste the layers to maintain stability, and consider using safety pins or spray adhesive for secure layering. Regularly checking thread tension and fabric movement will help achieve professional-looking results. This step is where creativity and skill merge, transforming fabric layers into a durable, beautiful quilt.
6.3 Hand-Stitching the Binding
Hand-stitching the binding is a delicate yet rewarding step in finishing a quilt. It ensures a professional and durable edge. To begin, thread your needle with coordinating thread and tie a knot. Fold the binding over twice to create a secure hem, then bring the needle up through the quilt layers and insert it back into the folded binding. Use small, even stitches to sew in place. Maintain consistent tension to avoid puckering. For a nearly invisible finish, match the thread color to the binding fabric. Hand-stitching allows for precision and a personal touch, making it a cherished technique among quilters. With patience, this method ensures your quilt’s edges are both beautiful and long-lasting.

Maintaining and Caring for Your Quilt
Regularly clean, store, and repair your quilt to preserve its quality. Gentle washing, proper folding, and timely mending ensure longevity and maintain its sentimental and aesthetic value.

7.1 Cleaning Your Quilt
Cleaning your quilt requires care to preserve its quality and sentimental value. Start by checking the fabric for stains or odors. For most quilts, a gentle hand wash with cold water and mild detergent is recommended. Avoid harsh chemicals or machine washing, as they can damage stitching or fade colors. Spot clean stains with a damp cloth, working gently from the outside in. For machine-washable quilts, use a delicate cycle and a protective mesh bag. Air dry by laying the quilt flat on a clean towel, away from direct sunlight. Never dry clean or iron a quilt, as heat can damage batting or fabrics. For deep cleaning, consider professional quilt cleaning services; Regular maintenance and proper storage will keep your quilt looking its best for years to come.
7.2 Storing Your Quilt
Proper storage is essential to maintain the quality and longevity of your quilt. Start by ensuring the quilt is clean and dry before storage to prevent mold or mildew. Use acid-free tissue paper or breathable fabric linings to protect the quilt from dust and moisture. Avoid folding quilts for extended periods, as this can cause creases and stress on the fabric. Instead, roll the quilt and store it in a cool, dry place away from direct sunlight. Consider using a quilt storage bag made of natural fibers like cotton or linen. For long-term storage, a cedar chest can help repel pests, but ensure the quilt is wrapped in a protective layer first. Check on the quilt periodically to ensure it remains in good condition. Proper storage will preserve your quilt for future generations to enjoy.
7.3 Repairing Your Quilt
Repairing your quilt is essential to extend its lifespan and maintain its beauty. Start by inspecting the quilt for worn, frayed, or loose areas; For small tears or holes, use a matching thread color to hand-stitch or machine-sew the damaged section. Apply a patch of fabric underneath if the hole is large. Loose stitching can be reinforced with additional sewing. For more extensive damage, such as unraveling seams, carefully remove the old stitching and re-sew the area. Use fabric scraps that match the original materials to blend repairs seamlessly. Regular cleaning and storage can prevent further damage. If the quilt is heirloom or intricate, consider consulting a professional quilter for restoration. Proper repair techniques ensure your quilt remains a cherished item for years to come.